Front Headphone Jack Not Working Windows 10

Windows 10 Front Audio Jack Speaker Not Working Problem Solved 2018 Problem Solved Solving Audio

How To Fix Headphones Not Working On Windows 10 Laptops Windows 10 Headphones Fix It

If Surface Pro 4 Or Surface Book Rear Front Facing Camera Is Not Working And Not Visible In Device Manager Then Surface Pro Camera Cover Microsoft Surface Pro

Iphone 6 Plus Ear Speaker Not Working Problem Solution Jumper Ways Iphone 6 Plus Iphone Iphone Solution

Details About Lenovo M910s I5 7500 32gb Ram 512gb Ssd 1tb Hdd Dvdrw Windows 10 Pro With Images Ssd Lenovo Hdd

Your New Smartphone Doesn T Have A Headphone Jack Here S What You Need Headphone Smartphone Best Smartphone

Set your audio device as default.
Front headphone jack not working windows 10.

7400t 2 40 Ghz With Two Usb 3 1 Gen1 Ports And A Headphone And Microphone Jack On The Front Panel Asuspro E520 Lets You Easi Locker Storage Desktop Pc Hdmi

How To Solve Samsung Galaxy Note 1 Audio Jack Problem Samsung Galaxy Note 1 Samsung Galaxy Note Samsung Mobile

Electronics Quad Touch Screen Windows 10

Details About Cyberpower Et8380 I7 8700 16gb Ram 1tb Ssd 1tb Hdd Gtx 1060 Win 10 Home Locker Storage Tablet Networking

Bluefire 3 5mm Ps4 Gaming Headset Bass Stereo Over Ear Gaming Headphone With Microphone And Volume Control Comp Ps4 Gaming Headset Xbox One S Gaming Headphones

Evoo 11 6 Tablet With Keyboard Quad Core Windows 10 2gb Memory 252gb Storage Micro Hdmi Dual Cameras Silver Tablet Microsoft Ipad Ipad Tablet

Really Cheap Bluetooth Car Device Works With Siri And Controls Your Music Car Bluetooth Dual Usb Phone Speaker

Redmi 5a Ear Speaker Ways Earpiece Problem Jumper Solution Earpiece Mobile Tricks Phone Repair
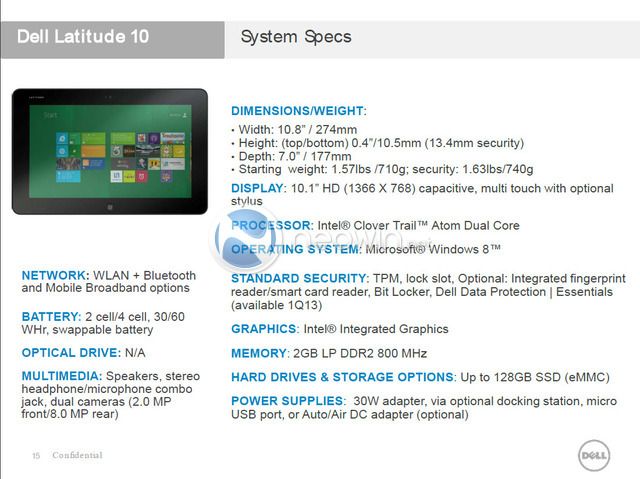
This Is Dell S Windows 8 Tablet Neowin Tablet Dell Latitude Multi Touch

Pin On Apple Iphone Xi 2019

Ebay Chipal 4 Ports Usb 2 0 Hub Usb2 0 Adapter Pc Front Panel Expansion Bracket With 10pin Cable For Desktop 3 5 Inch Fdd Flopp Floppy Disk Drive Usb Usb Hub

Ovleng Q5 Headphone With Mic Gaming Headset Computer Headsets
Visit To Buy Pc Computer Case Front Panel Usb Audio Port Mic Earphone Cable Advertisement Buy Pc Computer Case Pc Computer

Windows 10 Preview Beefs Up Do Not Disturb Feature And Sharpens Edge Browser Windows 10 Settings App Phone Messages

Lightning To 3 5mm Headphone Jack Adapter Axelect Iphone Lighting Adapter And Splitter 2 In 1 Lightning Cable To Audio Jack And Charger Adapter For Iphone X 8 Iphone 7 Adapter Iphone Light Iphone

2 In 1 Lightning To 3 5mm Headphone Audio Adapter And Lightning Charging Port For Iphone 7 7 Plus Black No Calling Functio Audio Adapter Headphone Adapter

Get Best Quality Of Over Head Phones On Up To 25 Off In Dausa Only At Vales International Trade For More Details Ki Best Gaming Headset Hyperx Gaming Headset

Best Buy Jbl Reflect Mini Bt In Ear Wireless Sport Headphones Teal Jblrefminibttel Wireless Sport Headphones Sports Headphones Headphones
Https Encrypted Tbn0 Gstatic Com Images Q Tbn 3aand9gcqb5sxjkvqbxjahjlf6lys2v7c Uiinrpra77qp4omsha7hmvdo Usqp Cau

Samsung Galaxy Note 3 Neo Voluem Up Down Keys Not Working Problem Solution Jumpers Samsung Galaxy Note Samsung Galaxy Galaxy Note

Cat Ears Rechargeable Led Lighted Headphones 5 Colors Cat Headphones Cat Ear Headphones Headphones

Amazon Com Nekteck Usb Type C Docking Station Supports Triple 4k Hd Displays 60w Power Delivery 4k Hdmi 30hz 4k Dp 60hz 5 Usb 3 Hdmi Usb Docking Station

Smart Connect 2 In 1 Lightning Cable To 3 5mm Headphone Jack And Charging Adapter Iphone 7 Splitter Iphone 7 Iphone Headphone

Amazon Com Hamswan Gaming Headset 2 4ghz Wireless Headphones With Detachable Mic And Rechargeable Battery Wireless Gaming Headset Headset Best Gaming Headset
Source : pinterest.com
